Tuesday, December 3, 2013

$5 off from eGlobal

Hey Guys

This Christmas season I am on a shopping spree. I just bought a new Nikon D5100 with Sigma 18-250mm lens for a friend from eGlobal. If you want to get $5 off you next order just use the friends code BUY5 to get your discount.


Thursday, November 28, 2013

500px Awesome account 40% off

Hey Guys

Another gem of an offer this time from 500px.

Get 40% off your Awesome account, just go to the link 500px.com/upgrade and use the promo code  00baa79724ff8

This offer wont last long, so make hay while the sun shines :)

Again whats in it for me? Once you sign up send me your Username in comments below which I will forward it to the 500px team and then we each receive an extra month of membership each on our accounts :)

Happy photographing.

http://fourbysix.com.au


Monday, November 25, 2013

Photojojo $5 off

Hey Guys

Just bought a new lens kit for my Android phone.


After the order was completed Photojojo offered me $5 discount that my friends can get when they use this link. So here is the link:

http://photojojo.com/r/b8ac

Just use this link to get $5 off on your next purchase from Photojojo.

What do I get you ask? I get $5 off on my next order as well :) Win-win?

Wednesday, June 5, 2013

Panaromas and time-lapse with your mobile using Spinpod!


Ever wanted to take panaromas )which were seamlessly stitched) or time lapse videos with your mobile?Your wish might soon come true!

Los Angles based Zhiping Chen and Daniel Aharoni have started a Kickstarter project Spinpod. This is a tool for capturing timelapse or panaromas with ease, using nothing but your mobiles and/or small action cameras.
Check out their video below which tells you about this cool device. (I am already backing their project so I am excited)


The product looks promising with the features that it provides. You can take cool panaroma shoots of your friends around a table/or just the traditional way. Place Spinpod on a flat surface and let it snap a selfie of you. It also allows time lapse videos with 0.5, 1, 2, 5, 10 second interval to capture your time lapse videos.


The Spinpod would also work as a tripod making sure that you get less shake on your photos. This means sharper photos :) The specification have been provided below:


If you are as exicited as I am to try this out, heads to their Kickstarter page and help them raise the necessary funds. There are only 25 days left for this.

Saturday, May 18, 2013

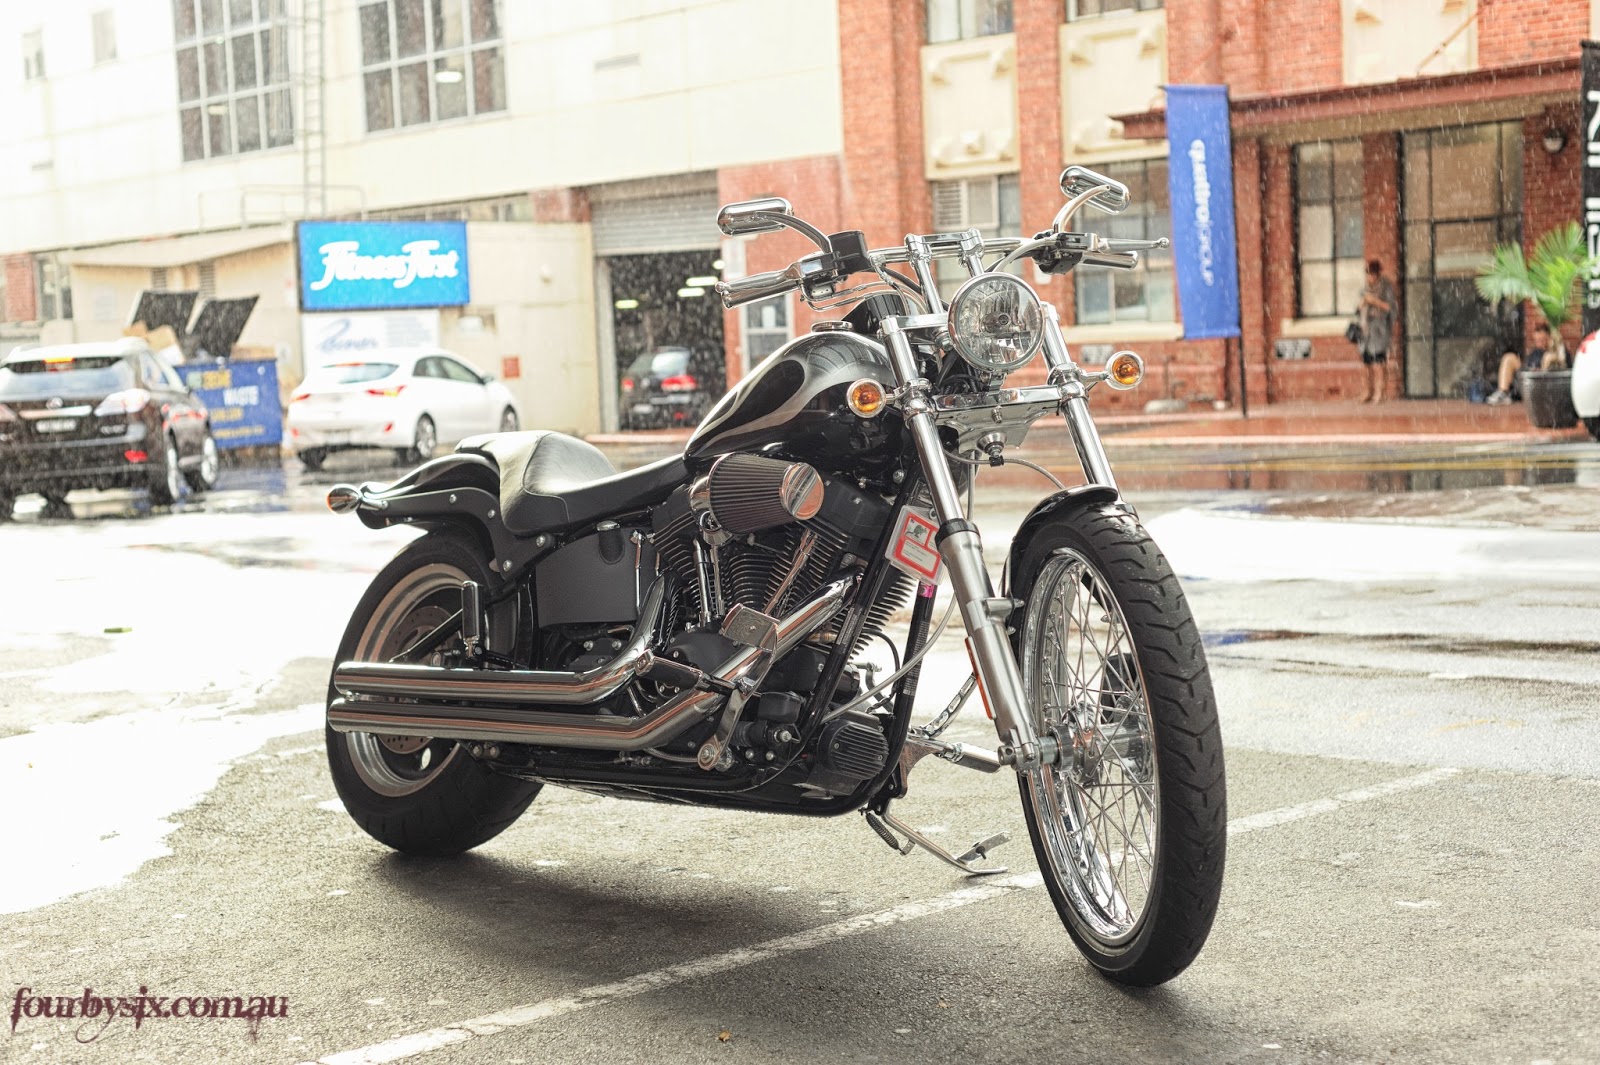
Harley

A couple months back I was asked to take a few photos of a Harley. The owner wanted the photos for online site so that they could sell it off.
I had not done anything like this before and I was very apprehensive. It was pouring down on the day that we decided to do the shoot.


The gear that I had with me that day was my Nikon D700, Nikkor 50mm F1.8 and my SB600 flash unit. I for reason decided to take photos only with my 50mm. One of the reason was that I knew 50mm being a prime lens would help me get sharper shots and secondly that was the only prime lens I had.
As it was pouring down, we decided to do the shoot in a garage which had a nice shed. The challenge there was that the wall at the back was too close to where the Harley was standing. I tried all different angles but however I might try the wall was going o be in my photos.


I did a few of shots of the Harley from either sides and then took shots of the detailing and the speedometer.


There was one good thing, I could place the Harley right at the edge of the shed and make my background go blur. But there was too much happening in the background. I tried changing my Aperture to the lowest to get a good bokeh, but it was too bright on the outside.


All the photos were corrected for exposure in Lightroom. Some of the shots have been shot as HDR images and combined in Photomatix Pro.

All in all it was a fun shoot :)


Hope you all enjoy the post. If you have any comments, please leave them below.

Saturday, May 11, 2013

Blurb it out!


"Stories are keepsake of families, cultures, communities and companies and provide the fundamental connections we as human crave"*

Yesterday morning at an ungodly hour (for me) we had a workshop and breakfast. The thing that made me signup for this workshop was of course the breakfast (not really), but what I was really interested in was the content that was going to be discussed.
The workshop was with Daniel Milnor who is a "Photographer at large" at Blurb. The topic of discussion was Tools of Modern Storytelling.  I went there with an open mind not knowing to to expect. As we took our seats (I had to sit right at the front as all other seats were taken), Daniel came over and started chatting. I didn't even know that he was the one who was going to present later. Daniel was introduced as a story teller which he thinks is a better term for someone who makes-up-things. But really he is a story teller. Daniel shared his insights about using Blurb and how Blurb is being used in the photography industry. But Blurb is not limited to just professional but anyone and everyone who has an urge to tell a story or want to capture memories in a book. Blurb recently opened its Australian office in Sydney and this workshop cum breakfast was part of the 5 day Roadshow that they had organized in Melbourne.

Daniel Milnor at the Blub Workshop in melbourne


Some things that I learnt at the workshop:
  • Blurb allows people to create books with Rich Media (a new word that I learnt at the workshop), which means that the user can embed sound and videos in their ebooks. 
  • We can create ebooks, magazines, photo-books, coffee table books, cook books using Blurb. 
  • The books that you create can be sold in the Bookstore and they can be made available world wide.
  • The BookSmart software which can be downloaded from here on your Mac or PC and is a very easy to use software.
  • If you do not want to install anything on your machine you can use Bookify directly from the blurb site.
  • They also have plugins for Lightroom 4 and InDesign which helps making books from within those softwares. The plugins can be downloaded here.
  • The S4 has a built in Blurb book maker software.
  • You can make your own book at as low as $4.95 per book.
  • Photographers can download their photos from either Flickr, SmugMug.

Some noteworthy books mentioned at the workshop:


Fuel Creative Group - They create Blurb books for their client meetings, each meeting has a different personalized Blurb book.

Andrew Kaufman - My Ceylon

Robert Leslie's Stormbelt


The first thing that I did when I got home was to create my Blurb account so that I could see what was all the talk about. And yes its very simple. So here are a few links to some cool offers from Blurb. 


  • I have joined in the Blurb Affiliate program (you can get your link to become an affiliate here).
  • Turn your Instagram photos to a Blurb book here.
  • Just for the month of May you can use this link to create your Blurb book and get 15% off.


OR

Like us on Facebook and leave us a comment below and 5 lucky winners will receive a $40 voucher to create your own Blurb book. But hurry as the voucher is valid only till 30th of June 2013 (Some conditions apply). 


*Taken from the presentation of Daniel Milnor.


Thursday, April 18, 2013

Its all about FOOD!!

So you go to a fancy restaurant or cafe and order something that you like. When the dish comes to your table presented in an awe aspiring way my hand automatically goes to my phone and out comes the food photographer in me. I snap the dish in various angles and try and focus on different elements on the plate. This obviously annoys the crap out of my friends and sometime might also mean cold food.

I have noticed that this is becoming more and more common in restaurants pretty much everywhere. You snap a photo and upload it to Facebook or Instagram it or Tweet it or you could be a photo blogger!

Last week I had an opportunity to meet a Food Blogger Ashley from I am so Hungree. This was again was a part of a meet up organized by Jeff (he has a knack of picking up interesting and varied topics).
This meetup took place in Cafe Blac (this deserves a blog post of its own, coming up soon).

Today's meet up was a bit like an informal chat where Ashley spoke about her experience as a food blogger. I have listed some of her tips in the post.

Ashley with the food blogging enthusiasts.
All the photos on this blog have been taken with Nikon D700 using Nikkor 50mm f1.8mm. All the shots have been shot in available light (which we had ample coming from the glass windows).

Shutter: 1/80 Seconds, F2.2, ISO 250
#Tip 1: If its possible sit closer to a window with natural light. This can be your source of light. In most pubs or fine dine restaurants the area near the bar or closer to the kitchen is more illuminated. So you can sit at those areas to get maximum light.

Shutter: 1/60 Seconds, F2.2, ISO 250
#Tip 2: Travel light when you go to a restaurant. Carry your fastest possible lens and keep the camera handy, so you dont have to wait once the food arrives.

Shutter: 1/60 Seconds, F2.2, ISO 250
#Tip 3: Make sure you have taken a few shots before the food arrives to get an idea about the light and adjust your camera settings.

Shutter: 1/80 Seconds, F2.2, ISO 250
#Tip 4: As a rule of thumb use f2.2 and shutter at 1/60 seconds. The shutter speed can be increased to get the desired effect. Its OK to increase the ISO but do not reduce the shutter below 1/60 to avoid getting camera shake or blurry images.

Shutter: 1/60 Seconds, F2.2, ISO 250
#Tip 5: Focus on the element on the dish that appeals you the most. It could be the green coriander on the egg or tomato on the salad. Make sure you control where you want your user to look and how the image should flow.

Shutter: 1/60 Seconds, F2.2, ISO 500
#Tip 6: Adding human element (hands) in the photo can enhance by the photo by providing a story to your photo.

Shutter: 1/80, F2.2, ISO 250
#Tip 7: Rotate the plate if required. Check which angle enhances the food on the plate. There is no need to capture the complete dish, you can concentrate on one element on the plate.


Shutter: 1/100, F2.2, ISO 500
#Tip 8: Avoid aligning the edges of the plate to the edge of the photo. (This tip, like most of the other tips in the blog are dependent on personal taste, use them according to your own taste) 


Shutter: 1/100 Seconds, F2.2, ISO 500
#Tip 9: If there is a texture that you would like to highlight, get up and close and try to show that through your photography.

Shutter: 1/125 Seconds, F2.2, ISO 500
#Tip 10: Make use of the table if it has a nice texture or an appealing colour (only if you are not going to eat the food or the table is very clean) (I would have like to have the knife and fork out of the tissue paper, but i didn't of it then hence the result.

Shutter: 1/80 Seconds, F2.2, ISO 250
#Tip 11: Last but not the least enjoy your meal and make sure you eat it when its still nice and warm.

So what are you waiting for? Get clicking!


Monday, April 8, 2013

My Light Painting experience


Light painting is what we all have been doing. Capturing light to make an image is a form of light painting. So to have hands on experience I attended a workshop.

This was sometime back in September 2012, the workshop was conducted by Jeff from the Melbourne Photography Workshops meetup which can be found here. It was aimed at taking long exposure shots while we used some form of light source.

The various available light sources were EL wires (which can be purchased on eBay), torches (they can be a bit too bright), LED's, steel wool (most used and my favourite), bike lights, sparklers (they do not last long, but make interesting patterns). Anything that produces light can be used for light painting. Experimenting with them is a lot of fun.

Light sources can be used by themselves to create interesting patterns or can be used along with a person to create some dramatic portraits.

A few things to remember when doing light painting. 

  • Make sure that the ISO is as low as possible. 
  • A tripod is a must. 
  • A shutter release though not crucial its a good to have (without shutter release you have to make sure that you are comfortable to manually depress the shutter button for more than 2minutes). 
  • A light source to help you focus (Manually focussing the camera is essential).
  • An aperture at around 8.0 is good to get most of the elements in the image in focus.


Shutter: 90 Seconds, f8.0, ISO 200

This image was created as follows:
Light Source use: Green EL

We were a group of 3, one of us stood at a distance while the rest of us focused our cameras using a LED torch. The second person turned the EL wire ON. When the shutter was released, the EL wire was zigzagged around the person.
To get an even more dramatic photo, after the EL wire is zigzagged use a torch to trace the outline of the person. This will give a clear distinction between the green of the EL wire and the person standing.


Shutter: 25 Seconds, f10, ISO 250


This is a classic Steel wool shot. Jeff our workshop instructor was whirling the ignited steel wool and we were all happily snapping away. The trick what Jeff told us was to have a shutter speed that matched the length of the steel wool. So just a rough estimate of how long would the steel wool take to burn completely. If the shutter speed was more than the time taken by the steel wool to burn then we would be able to see the trail of the steel wool rather than an orb.

Shutter: 20 Seconds, f8.0, ISO 250


A few more examples of what we tried at the workshop.

 Shutter: 121 Seconds, f8, ISO 200

Shutter: 15 Seconds, f13, ISO250


Light-painting is a lot of fun. So start experimenting and let me know how you go!